

spacers don't, bolt does - if the spacer went through it would push the window against the sealWhat stops it dropping then? Or do your spacers go through the window at the bottom?
")
spacers don't, bolt does - if the spacer went through it would push the window against the sealWhat stops it dropping then? Or do your spacers go through the window at the bottom?
Yeahh indeed it is, I also can't guage how it will work without a thread on the bracket itself.That material is very thin in places for something like a brake calliper mount.
Thank you Dan, yeahh somehow I've got quite a lot of motivation for this, considering motivation lacks anywhere else...Enjoy this thread. Great updates and effort!
Wish I could be arsed to do it myself! Ha ha.
For now I'll keep reading everyone else's projects [emoji14]
Did lol at the fuel tank [emoji41]
Enjoy this thread. Great updates and effort!
Wish I could be arsed to do it myself! Ha ha.
For now I'll keep reading everyone else's projects [emoji14]
Did lol at the fuel tank [emoji41]
No mate, these were made ages ago, I did buy blind tbf, and the description of group buy and 197 brackets swayed me over what they actually looked like.If those are some of the brackets that are now available, I think I'll stick to the proper ones I'll be having made. There's zero strength in them whatsoever! There's nothing for the caliper bolts to thread into for a start!!
That cake is f**king disturbing!!!
Also? I can't see the other post?Also, why th hydro handbrake? I assume it's never going on the road again?
I will put them in the boot for MOT, the guy I know is usually pretty good for low road mileage cars like mine, as long it's to a good standard, which mine hopefully is.Ah so you're keeping the cables as well?
Yeah that's fair enough, The handbrake doesn't get used, and it's always left in gear on my flat drive... and both my mates rally cars are road legal with hydros with MOTs etc. So should be reetMines pretty leanient and he wouldn't let that through..
ahh I wanna be just like a WRC car lolsYes, the handbrake must be of a mechanical setup. Hydro will be in addition on a rally car. Even the WRC cars have a cable handbrake
Keep chatting away mate lol I enjoy reading your thread. [emoji2]
Looks like your making good progress. How much were the engine mounts you brought and why they taking so long?
Got my engine back the other day and started working on mine again
Looks f**king awesome mate!
Purposefull! Its gonna be awesome when it's done.
Enjoy reading the thread and look forward to the finished job and some pics and vids on track [emoji106] [emoji41]
Excellent work on the new car!
Shame about the ph1 regarding the work that you did, but as you said, silver lining. Problem is, I think half the remaining ph1's suffer from that problem. I'm breaking mine atm but to my amazement it doesn't have any rust whatsoever, inside or out.
LOL - totally forgot about that, sorted!At least you don't have to update your car under your avatar now :wink:
Hi there, I've a Ph1 172 also and have been thinking of removing PAS and just looping the rack.Rack has been looped, was a good job till I started to bend it into place...

also what do I do with top holes on the rack in this picture where the res lines used to go into?
Removed all the airbag ecu and loom also, and I can't for the lift of me remember where this plug goes?

to do list:
- Finish off loom (mostly tape'ing to go)
- Wire in EPAS, and find a Ph2 squib so that can be finished
- Bleed cup brake system
- Replaced cv boots on both drive shafts
- Fit cambelt, dephaser, water pump, clutch, inner and outer Arb bushes and steering rack bushes
Hello, yep are you thinking of going epas? or just manual steering?Hi there, I've a Ph1 172 also and have been thinking of removing PAS and just looping the rack.
Any advice or problems I should look for?
I imagine you have just looped it, blanked holes and removed the pump, reservoir, lines etc?
Any help or advice much appreciated, cheers...
Cool, my intention was just to loop the rack, go manual and remove components. I'm determined to do a build on a ridiculously tight budget and my best friend so far has been my trusty angle grinder!!!Hello, yep are you thinking of going epas? or just manual steering?
as I would recommend epas! love it, I've heard of lot of people hating manual also - I think have PAS while in a tank slapper while give you the extra input you need to control it quicker...
but yep, loop the 2 ports in the pic, blocked the remaining ports with tin foil. (they arnt under pressure) so no need for bolts.
and yep removed everything that holds fluid basically.


Cool, my intention was just to loop the rack, go manual and remove components. I'm determined to do a build on a ridiculously tight budget and my best friend so far has been my trusty angle grinder!!!
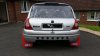
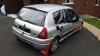
Here's the toy so far...
They're just 'Jack Screws' pilfered from my brothers builders van!!!I should of bought shares in cap head bolts/rivets before you put those windows in :wink:
haha, looks good, not a fan of the stickers but its your car and your opinion that matters :smile:
Cool, my intention was just to loop the rack, go manual and remove components. I'm determined to do a build on a ridiculously tight budget and my best friend so far has been my trusty angle grinder!!!
Here's the toy so far...
They're just 'Jack Screws' pilfered from my brothers builders van!!!
Stickers etc are more for the benefit of my 13 year old who I'm trying to teach the tools to. I call the Clio 'Anti Playstation Device'!!!
Anywhere I can lose weight, particularly from the front is a bonus. Obviously there's an engine draw running pump but would you have any idea of weight savings?
EPAS would appeal but I'll be honest and say I won't spend the money...
Appreciate the info buddy, I currently have aircon removed and just enough of pump left (basterdized) to run the belt. I'm thinking a cup alternator setup with aircon pump and pas system removed. Should be a nice little winter project leaving less weight on the nose...I should of bought shares in cap head bolts/rivets before you put those windows in :wink:
haha, looks good, not a fan of the stickers but its your car and your o
Thats fair enough, top dad!
Im gonna go with estimates:
-Pas pump 4kg and piping/resivouir 2kg
but the weight I've saved is probably the weight I've put back in with the pas column the motor is heavy!