

Looks like it shouldn't take too long to get it running :grinning:
ClioSport.net
-
When you purchase through links on our site, we may earn an affiliate commission. Read more here.
You are using an out of date browser. It may not display this or other websites correctly.
You should upgrade or use an alternative browser.
You should upgrade or use an alternative browser.
Project: Nick Frost 172
- Thread starter JP83
- Start date
Jekyll
ClioSport Club Member
Harnesses look good.
I've used paraffin before to remove the sound deadening with a heat gun and scraper, worked a treat.
I've used paraffin before to remove the sound deadening with a heat gun and scraper, worked a treat.
Harnesses look good.
I've used paraffin before to remove the sound deadening with a heat gun and scraper, worked a treat.
I used this random orange degreaser my bro left me. Shifted the leftover residue a treat!
Goooooooooddiiieeessss
I've already got a Battery and cage, all I need to do really is sort the cabling out for relocating it, and then organise a little get together at mine.
Looks like it shouldn't take too long to get it running :grinning:
I've already got a Battery and cage, all I need to do really is sort the cabling out for relocating it, and then organise a little get together at mine.
So a little progress today after I came home from shopping.
Test fitted the new induction setup:

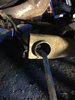
Closer inspection of a coolant pipe reveals a bit of leakage. New pipe time?

Bit of oil under the inlet manifold too. Looks to be coming from the pipe that goes to the carbon canister:

Dash now looks like this.

Can't find anymore bolts, so are these plastic welds?

Finally. Not a bad view from the garage. Even with the rain.

Test fitted the new induction setup:
Closer inspection of a coolant pipe reveals a bit of leakage. New pipe time?
Bit of oil under the inlet manifold too. Looks to be coming from the pipe that goes to the carbon canister:
Dash now looks like this.
Can't find anymore bolts, so are these plastic welds?
Finally. Not a bad view from the garage. Even with the rain.
Answered my own question. No they're not plastic welds holding the dash in.
b*****d dashboard is out.

b*****d dashboard is out.
Got a host of parts arriving.
Today is thermostat, top mount kit, top shock rubbers, battery cable, connectors and catch tank
Also have my clamping tool.

Today is thermostat, top mount kit, top shock rubbers, battery cable, connectors and catch tank
Also have my clamping tool.
So this weekend just gone, I had a lot of help to get cracking on the project.
The motor is now out and will be given a clean before receiving new belts and an aircon delete setup.

We found a lesser-spotted @Cookie in the bay too.


Obligatory Angle Grinding shot - still can't get the damned snapped towing eye out.

Small list of parts to replace.
Knackered driveshaft, starter motor and need a new castle nut for the end of the driveshaft.
The motor is now out and will be given a clean before receiving new belts and an aircon delete setup.
We found a lesser-spotted @Cookie in the bay too.
Obligatory Angle Grinding shot - still can't get the damned snapped towing eye out.
Small list of parts to replace.
Knackered driveshaft, starter motor and need a new castle nut for the end of the driveshaft.
I see the cat litter is still doing it's job well
Strike of genius in my part. Soaked everything up (just about). Have left it there for now whilst I clean up the engine bay.
Continued cleaning the engine bay this morning, and removed the sound deadening material.

Also replaced the standard dog bone mount with a Powerflex one, and removed the grilles from the front bumper ready to clean them up and paint them in bright green!
Also replaced the standard dog bone mount with a Powerflex one, and removed the grilles from the front bumper ready to clean them up and paint them in bright green!
Massive thanks today to @optical and @Steven103
Both came over today to help (when I say help, they did pretty much everything!). Gus and I got on with cleaning the engine, and we also got it on the stand.
Might even be able to return @Tony Hunter his engine hoist soon I hope too!
Steven ploughed straight on with spannering away on the car. He's like a machine.
Hit a couple of minor snags. One of the bolts on the rear stub axle needs drilling out. Unfortunately my drill bits weren't up to the task, so need some better ones.
We also managed to get the steering rack out, but can't fathom out how the new EPAS one (DCI) bolts in?
So here is the dci rack from an 04 plate. Part number matches the one in the epas thread. But how does it bolt in?!


@sonny172cup - saw you fitted EPAS. Can you shed any light on how the DCI rack fixes in place?
NorthloopCup
ClioSport Moderator
You need to remove the aluminium brackets off the subframe mate as they're not required.
When you say remove, is that with an angle grinder?!You need to remove the aluminium brackets off the subframe mate as they're not required.
NorthloopCup
ClioSport Moderator
Lol no mate. They're bolted through the subframe!When you say remove, is that with an angle grinder?!
Ah, happy days. Slightly gutted I don't get to use the angle grinder, but I'm sure unbolting them is better.Lol no mate. They're bolted through the subframe!
Another update, and quite a bit of progress was made this weekend.
Massive, massive thanks to @Scrooge
He came up yesterday to fit the cambelt, and then we got a bit carried away with carrying on. That resulted in the engine and gearbox being painted, the ancillaries reassembled, and dropping it back into the car!
Pictures to follow...
Massive, massive thanks to @Scrooge
He came up yesterday to fit the cambelt, and then we got a bit carried away with carrying on. That resulted in the engine and gearbox being painted, the ancillaries reassembled, and dropping it back into the car!
Pictures to follow...
So after last week when @Gus and @Steven103 visited, the engine was cleaned and left to dry.
I attacked it mid week with some rust remover gel that Gus left, and gave it a good clean. It got a fair bit off, but still required a lot of work.

Come yesterday, @Scrooge came up and fitted the cambelt for me, and then we got a bit carried away!

Cup kit from @Russ Rallye was given a lick of paint too.

We did have a bit of a moment where my over enthusiastic spraying lead to some overspray on the passenger wing! Lol.
Got it cleaned off though.
Engine and auxiliary bits on.

I ran out of silver paint and time was pressing on, so I decided on black for the gearbox. I actually like it too.

We finally called it a night at around 11pm as we cannot find the bolts for the gearbox mount (might need to source some more)

All sitting pretty in the engine bay. To think I wasn't even going to paint anything when I started this project...

I attacked it mid week with some rust remover gel that Gus left, and gave it a good clean. It got a fair bit off, but still required a lot of work.
Come yesterday, @Scrooge came up and fitted the cambelt for me, and then we got a bit carried away!
Cup kit from @Russ Rallye was given a lick of paint too.
We did have a bit of a moment where my over enthusiastic spraying lead to some overspray on the passenger wing! Lol.
Got it cleaned off though.
Engine and auxiliary bits on.
I ran out of silver paint and time was pressing on, so I decided on black for the gearbox. I actually like it too.
We finally called it a night at around 11pm as we cannot find the bolts for the gearbox mount (might need to source some more)
All sitting pretty in the engine bay. To think I wasn't even going to paint anything when I started this project...
Oh, and the roll cage has turned up. Have decided on a Custom Cages clubman cage.
Poor lad who delivered it was on his lonesome, and was back at work with a dodgy knee after having surgery on it. That cage is about 25+ KG packaged up!
Poor lad who delivered it was on his lonesome, and was back at work with a dodgy knee after having surgery on it. That cage is about 25+ KG packaged up!
NorthloopCup
ClioSport Moderator
Good choice of cage. That's the same one I've got in my cup.Oh, and the roll cage has turned up. Have decided on a Custom Cages clubman cage.
Poor lad who delivered it was on his lonesome, and was back at work with a dodgy knee after having surgery on it. That cage is about 25+ KG packaged up!
Pictures of the cage!
Good choice of cage. That's the same one I've got in my cup.
Good. Hopefully got a very decent welder lined up too, so it'll be nice and secure.
Did make me laugh when I opened the pack, and found a CD of pictures of the clio "international" cage. Still, it shows the basic structure that makes up the clubman cage anyway.
No pics yet Ali - it's just big bits of metal in a box at the mow. Currently stored against the side of the car in the garage (thought how nice it was to gain all that space back now the engine is back in the bay, and it's now been taken up by the roll cage! Lol!).
Also, I had decided a while back that the inlet manifold, calipers and other bits, were going to be Acid Green!

So the roll cage arrived last week. Steven and his buddy Chris popped by to check it out.
We mocked up how it will look, and found its not a dash dodger! Lol!

So dash bars and look will come out (as they were for welding anyway), and I'll need to source a dash bar from custom cages.
We mocked up how it will look, and found its not a dash dodger! Lol!
So dash bars and look will come out (as they were for welding anyway), and I'll need to source a dash bar from custom cages.
In the heroic efforts to remove the motor, the alternator was terminal but also the live feed to it as well. Few minutes later, a new connector is on

Along with the new coolant bottle. Almost seems a shame to use the standard pipe work now. Just refresh the clios for now.

Along with the new coolant bottle. Almost seems a shame to use the standard pipe work now. Just refresh the clios for now.
@optical popped over this afternoon and we set about dropping the rear beam to install the powerflex rear beam bushes. It had an advisory for perished bushes on the last MOT so thought I best get them changed now.
We can both see why people complain about this job.
The first issue we had was after disconnecting the brake lines, we couldn't get the handbrake cables off. Not the end of the world, as we dropped the beam and just eased the tension on the handbrake cables.
What we learned from the experience.
The right tools would really help.
One side was easy. The other side is refusing the budge, but it's getting there.
We're never doing another!
Attachments
JP & Gus doing rear bushes for everyone at the next meet then...!.
GET TAE FUUCCKKKK
You don't need a dash bar. Dash can mount off of tabs welded to the cage & firewall. Steering column is self supporting.
OK. What about from a safety perspective? Is it worth having a bar there for the sake of £30?
NorthloopCup
ClioSport Moderator
So had a bit of time this morning to start painting the inlet manifold. First coat is on...

any more news?!
So this weekend the boys came round for a last minute, mini meet. Saturday was a bit of a wash out, and with @Bear Head getting his Brembo's fitted, and @RyG swapping his dash out, it was done to @Steven103 and me to crack on with the car (mostly Steven!).
In the days before the weekend I had finally got the other rear beam collar out, and took great delight in telling it what I thought of it.

Rear beam bushes all done.

Roll on Saturday, and after some magical mechanical wizadry by Steven, the car was coming together nicely. Although we found I needed a new radiator, so a trip to EuroCarParts was made, and thankfully they had 1 left in stock!
One side of the suspension all on, along with the driveshaft, and this is how it was looking by the end of Saturday.

Obviously the long day took it's toll on some @jaswalker24

Sunday morning came around, and for about 2 hours, I was under the impression that Steven was having a well earned lie in upstairs. Only, he wasn't. He said he was leaving early the next day and he meant it! 😂
My first job of the day (before the calamitous saga that was the fitting of Ryan's dash), was to get the other tie rod off.
I'd popped down to Halfords and got a 32/36mm viscous spanner which helped get the other side off, but even though there was more room on the driver's side, it was proving awkward to get a good grip on it. A jack sat on a large chunk of wood gave us the lift we needed to undo the tie rod. Gratuitous swearing at random car part shot no.2

By the way, how many monkeys does it take to fit a dash? @optical @Bear Head @RyG

As you might have guessed from the pictures so far, lime green is the colour of the day (or, well, a long time at least).
The calipers have been supplied by @optical, and he'd given them a lick of green paint already. I just needed to add the second layer to match my other painted bits.

In the days before the weekend I had finally got the other rear beam collar out, and took great delight in telling it what I thought of it.
Rear beam bushes all done.
Roll on Saturday, and after some magical mechanical wizadry by Steven, the car was coming together nicely. Although we found I needed a new radiator, so a trip to EuroCarParts was made, and thankfully they had 1 left in stock!
One side of the suspension all on, along with the driveshaft, and this is how it was looking by the end of Saturday.
Obviously the long day took it's toll on some @jaswalker24
Sunday morning came around, and for about 2 hours, I was under the impression that Steven was having a well earned lie in upstairs. Only, he wasn't. He said he was leaving early the next day and he meant it! 😂
My first job of the day (before the calamitous saga that was the fitting of Ryan's dash), was to get the other tie rod off.
I'd popped down to Halfords and got a 32/36mm viscous spanner which helped get the other side off, but even though there was more room on the driver's side, it was proving awkward to get a good grip on it. A jack sat on a large chunk of wood gave us the lift we needed to undo the tie rod. Gratuitous swearing at random car part shot no.2
By the way, how many monkeys does it take to fit a dash? @optical @Bear Head @RyG
As you might have guessed from the pictures so far, lime green is the colour of the day (or, well, a long time at least).
The calipers have been supplied by @optical, and he'd given them a lick of green paint already. I just needed to add the second layer to match my other painted bits.
Easter Monday...
I woke up with a whole day free to myself, which was to be spent down in the garage. Little did I know what would be in store for the day!
In the morning I got a couple of jobs done. Firstly, fitted the fuel tank breather now the carbon cannister is gone.

Then got the heat shield fitted

Steven has previously started to mock up the design for a catch tank bracket. I took his cardboard design, adapted it slightly, and got underway with fitting that, and mocking up the ECU bracket.

Then I get a text from @Steven103 saying am I free, and can he pop over. Sure, why not!
He arrives just before 5pm, and then proceeds to work like a whirlwind, whilst I occasionally help/ pass tools/ provide beverages/ get in the way. The man is a car building machine!
The mission: To see if we can get the car to a state where it can be fired up!
However, before that, there's a few other jobs that are completed.
Rear beam is re-attached
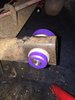
New stub axle spacers with shims (thanks @Budgie ) are fitted
Rear brakelines attached, and discs, calipers, pads, and rear shocks are fitted.

Front suspension on, driveshafts in, but we find that the front brake line unions are fudged. Shame, as they're braided lines too. So I'm on the lookout!

It's getting late, and Steven is spannering away trying to get the car to a point where we can fire it up.
Dash is plugged in, lambda sensor plugged in, gear linkage re-attached, engine filled with oil, gearbox filled with oil, driveshaft leaking... Hold on a minute... c**k
Yup, the driveshaft was leaking. Slight panic as this was one of the replacements I'd bought off eBay. We whipped it off, only to find the bolts with it were the wrong ones - too long that they weren't pulling the gaitor and clamp to the gearbox casing to seal it tight. D'oh!
So the gearbox was drained (that stuff reeks!), driveshaft re-fitted, and the gearbox oil re-added (to be checked when it's on wheels and level!).
No battery at this point, so we rolled my car forward and hooked up the jump leads. However, not a peep. No lights or anything.
Now the earth lead that goes to the battery, has another connector on the end, but I don't know where this connects to - if anyone can shed some light on this it'd be massively appreciated!
Otherwise, I was a bit stumped as to why there was no life at all. However, at 11:45pm, it was really time to call it a night!
Massive thanks to @Steven103 again for his help!

I woke up with a whole day free to myself, which was to be spent down in the garage. Little did I know what would be in store for the day!
In the morning I got a couple of jobs done. Firstly, fitted the fuel tank breather now the carbon cannister is gone.
Then got the heat shield fitted
Steven has previously started to mock up the design for a catch tank bracket. I took his cardboard design, adapted it slightly, and got underway with fitting that, and mocking up the ECU bracket.
Then I get a text from @Steven103 saying am I free, and can he pop over. Sure, why not!
He arrives just before 5pm, and then proceeds to work like a whirlwind, whilst I occasionally help/ pass tools/ provide beverages/ get in the way. The man is a car building machine!
The mission: To see if we can get the car to a state where it can be fired up!
However, before that, there's a few other jobs that are completed.
Rear beam is re-attached
New stub axle spacers with shims (thanks @Budgie ) are fitted
Rear brakelines attached, and discs, calipers, pads, and rear shocks are fitted.
Front suspension on, driveshafts in, but we find that the front brake line unions are fudged. Shame, as they're braided lines too. So I'm on the lookout!
It's getting late, and Steven is spannering away trying to get the car to a point where we can fire it up.
Dash is plugged in, lambda sensor plugged in, gear linkage re-attached, engine filled with oil, gearbox filled with oil, driveshaft leaking... Hold on a minute... c**k
Yup, the driveshaft was leaking. Slight panic as this was one of the replacements I'd bought off eBay. We whipped it off, only to find the bolts with it were the wrong ones - too long that they weren't pulling the gaitor and clamp to the gearbox casing to seal it tight. D'oh!
So the gearbox was drained (that stuff reeks!), driveshaft re-fitted, and the gearbox oil re-added (to be checked when it's on wheels and level!).
No battery at this point, so we rolled my car forward and hooked up the jump leads. However, not a peep. No lights or anything.
Now the earth lead that goes to the battery, has another connector on the end, but I don't know where this connects to - if anyone can shed some light on this it'd be massively appreciated!
Otherwise, I was a bit stumped as to why there was no life at all. However, at 11:45pm, it was really time to call it a night!
Massive thanks to @Steven103 again for his help!
Golf 7.5R & Clio 200
Looking good JP!
Thanks to everyone for the help on my dash.

Thanks to everyone for the help on my dash.
Similar threads
- Replies
- 358
- Views
- 81K
- Replies
- 125
- Views
- 39K
- Replies
- 469
- Views
- 69K